So, I've switched to the new format for blogger with hopes that it will help solve a few issues I've had with blogger (posting pictures was a hassle). Now I can give you more details on how I made my melted crayon monogram art. Yay!
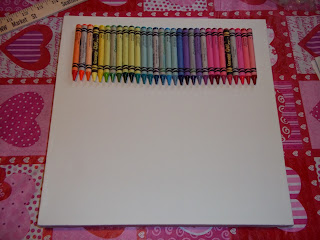
I decided on a 1" border so I marked that out with pencil, and started hot gluing the crayons on the canvas.
All done hot gluing! I used 30 (I think) crayons on a 12"x12" canvas.
I layered strips of blue painters tape vertically & made another layer horizontally for the monogram. I found a font I liked in Word, and printed out the size I thought fit well. Then cut around it with an Exact-o knife. Getting the tape 'K' off the cutting mat was the hardest part of this project!
Ready to melt! I used my embossing gun instead of a hair dryer. The embossing gun put out hot air, but has less force so the crayon doesn't splatter as much (it splattered a little as you can see in the picture below).
Finished melting; now letting it dry/cool. I had a mini panic attack when I peeled off the tape, and saw it had bled through the edges.
Not to worry though, a little tracing with a black sharpie (that no longer works due to waxiness on the tip...oops!) solved my problem. Notice the splatters of red & orange on either side? I think it adds character! My personal favorite is the added shimmer from the glitter crayons, but I love anything sparkly. :)
Here's the finished product hanging up in my room. Yeah, I know it's not centered. I happened to have a nail there from a larger picture that got taken down.
Overall this was a cheap, easy, and quick project. The only cost was the canvas which was $6 at Big Lots since I already had the crayons, hot glue & glue gun, Exact-o knife, and embossing gun. It only took me an hour tops. Cutting out the monogram, and gluing the crayons took the longest. So now you know the details of my second Pinterest craft project.


No comments:
Post a Comment